Are you ready for the next part of the tutorial? If you missed part 1, go to yesterday's post. Today, we are going to make the mask "pretty" by adding paper to it.

 1. Open your circle mask .png file that you created in the first tutorial. If you do not have the first tutorial (Design a Photo Mask), you can download a copy at my blog.
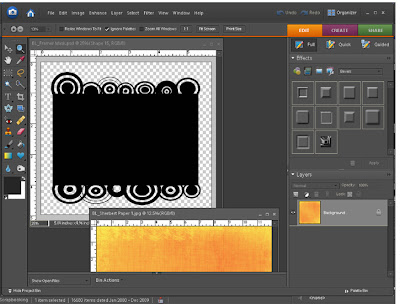 2. Open some paper. I opened Sherbert Paper 1 from my Sherbert kit.
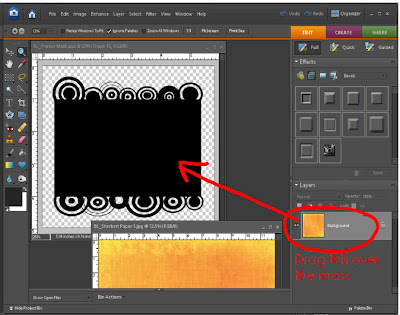 3. Click on the layer that shows the paper and drag it over the circle mask. You should now see the paper only as the mask is underneath it. You should have 2 layers in your layer palette. Close the paper file as you are done with it.
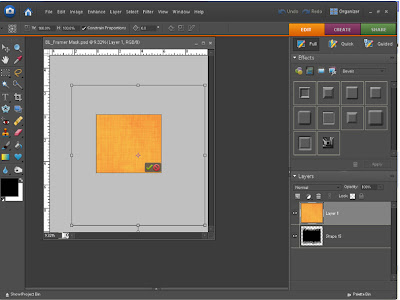 4. Since the paper file is size 12X12 and my mask is much smaller the paper will be too big to show nice detail. In order to show the detail of the paper correctly you need to reduce the paper size to just fit over the mask. You can do this by clicking CTRL + T, then CTRL + 0 (zero). You should see the bounding box. Click on a corner of the box and reduce the size of the paper to just fit over the mask. Click the green check when done.
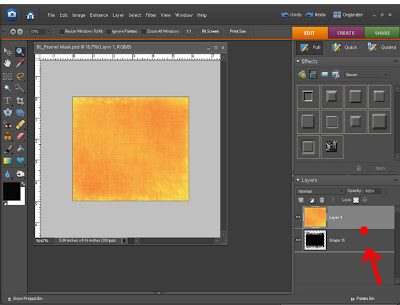 5. We are ready to make a clipping mask now. See the red circle on the screen above? Put your mouse there… between the two layers. Hold the ALT button down. You should see what looks like 2 black circles joined together. Click. You should be able to see your beautiful circle mask now!
 6. Notice what has happened to your layers. The paper layer has moved to the left with an arrow. It has been “clipped” to the layer below. Save as a .png file.
If you liked this tutorial or have any questions, please leave a comment on my blog. Thank you and enjoy! If you want to download a copy of this tutorial in .pdf format, click here. Also, if you want a copy of the circle mask template in .png format, click here.

Circles Mask Tutorial
Also known as Design a Photo Mask- part 2
Also known as Design a Photo Mask- part 2
 1. Open your circle mask .png file that you created in the first tutorial. If you do not have the first tutorial (Design a Photo Mask), you can download a copy at my blog.
 2. Open some paper. I opened Sherbert Paper 1 from my Sherbert kit.
  3. Click on the layer that shows the paper and drag it over the circle mask. You should now see the paper only as the mask is underneath it. You should have 2 layers in your layer palette. Close the paper file as you are done with it.
  4. Since the paper file is size 12X12 and my mask is much smaller the paper will be too big to show nice detail. In order to show the detail of the paper correctly you need to reduce the paper size to just fit over the mask. You can do this by clicking CTRL + T, then CTRL + 0 (zero). You should see the bounding box. Click on a corner of the box and reduce the size of the paper to just fit over the mask. Click the green check when done.
  5. We are ready to make a clipping mask now. See the red circle on the screen above? Put your mouse there… between the two layers. Hold the ALT button down. You should see what looks like 2 black circles joined together. Click. You should be able to see your beautiful circle mask now!
  6. Notice what has happened to your layers. The paper layer has moved to the left with an arrow. It has been “clipped” to the layer below. Save as a .png file.
If you liked this tutorial or have any questions, please leave a comment on my blog. Thank you and enjoy! If you want to download a copy of this tutorial in .pdf format, click here. Also, if you want a copy of the circle mask template in .png format, click here.
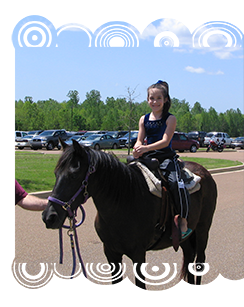
Here's another example of using a photo with the mask. Please note that I cropped the mask to fit the photo.


8 comments:
Thank you. I hope you do some more tutorials.
Hi Barbara,
I LOVE that you are doing these!!!!
You are incredibly thoughtful. I know a lot about Photoshop - but it seems I often take the hard way to get things done (sometimes). But lately, with the book project - I have been learning so much, just from trial and error.
Hope the sun is shining where you are - it sure is here - FINALLY!
hugs,
eila
Thank you so much for this tutorial. I want to let you know that I posted a link to your blog in SARIWO Digiscrap Freebies Search Engine, different to also find out can about Your works. Look at the post:
07 kwiecien 2009 [ hour 5:00pm EU].Thanks again.
Thank you so much for sharing your knowledge. I love finding helpful tutorials.
Thank you so much for this Freebie. I want to let you know that I posted a link to your blog in Creative Busy Hands Scrapbook Freebies Search List, under the Photoshop/Gimp Resource(s) (Brush(es), Swatch/Palette, ...) post on Apr. 07, 2009. Thanks again.
SOOOOOOOOOOOOOOOO Awesome! Thank you for showing me (and everyone) how to do this! I am very excited to try it out on Friday (my scrapbooking day! lol)
I loved this tutorial. I tried it right away and love the product I was able to create. A zillion thanks to you! I really hope you'll do some more tutorials... you are a wonderful teacher!
A Wisconsin hug for you!
Joni Possin
Thank you for the info! I am pretty new to the digital scrapping world, so this was VERY helpful! I was wondering if you would be willing to show us how to make our own blog background?? I know you are busy, so only if you are interested or have time. Thanks again!
Post a Comment